Integrating Smart Home Devices: A Comprehensive Guide to Central Control Systems
I run Home Assistant on a Raspberry Pi as my central controller. I prefer local control and a touchscreen that shows the doorbell camera, heat pump status and ventilation unit readouts. This guide walks through getting started, the hardware I pick, and how to build reliable automations. Expect concrete steps and config ideas you can copy.
Getting Started with Smart Home Integration
Overview of Smart Home Integration
Smart home integration is about joining different devices so they talk to one controller. That controller becomes the single place for status, control and automation. I use the phrase smart home integration to cover sensors, cameras, HVAC gear such as a heat pump, a ventilation unit, lighting and doorbell camera feeds.
Importance of Centralised Control
A single controller removes guesswork. It gives one dashboard for the doorbell camera, the heat pump and the ventilation unit. It lets you create automations that span radios and vendors. It also makes local automation possible, which avoids cloud lag and privacy leaks.
Setting Up Your Home Assistant
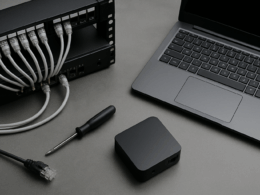
I recommend Home Assistant on a Raspberry Pi 4, 4GB or 8GB. Use Home Assistant OS on a fast SD card or an SSD on a USB 3 adapter. Steps:
- Download the Home Assistant image and flash it to your storage media.
- Boot the Pi and complete the initial web setup on http://homeassistant.local:8123 or the Pi’s IP.
- Add integrations: MQTT broker, ONVIF or RTSP for cameras, Z‑Wave/Zigbee via USB stick if you have those radios.
- Install the Lovelace dashboard and create a simple camera card to show the doorbell camera on the touchscreen.
Verification: open the Lovelace view on the touchscreen and tap the camera card. The feed should display with low delay. If the feed freezes, swap to RTSP in the camera settings.
Choosing the Right Hardware
Pick hardware that supports local protocols. My checklist:
- Raspberry Pi 4, 4GB/8GB, SSD boot if budget allows.
- USB Zigbee stick (ConBee II or Sonoff Zigbee 3.0).
- USB Z‑Wave stick if you have Z‑Wave devices.
- Ethernet to the Pi for stability, not Wi‑Fi, if you can.
- Touchscreen: a 7–10 inch HDMI touch panel works for hallway displays.
- Camera: a doorbell camera that offers RTSP or ONVIF will integrate cleanly.
For a heat pump and ventilation unit, check the unit manuals for Modbus, LAN API or dry contacts. Many HVAC and recuperation units expose Modbus RTU or Modbus TCP, or a simple open/close input for mode control. If the unit lacks a network port, a gateway or a relay interface may be required.
Compatibility with Smart Devices
Casambi lighting uses Bluetooth mesh. It needs a Casambi gateway or a bridge that talks to Home Assistant. Sonoff and Tuya devices often work if you can flash local firmware such as Tasmota, or if the device supports local MQTT or a LAN API. If a device is cloud‑only and cannot be local, treat it as less reliable and prefer replacing it with a local‑friendly model.
Practical check: before buying, confirm the device supports RTSP, ONVIF, MQTT, Modbus or a documented LAN API.
Advanced Smart Home Automation Techniques
Integrating Multiple Devices
My goal was one touchscreen that shows the doorbell camera and controls HVAC and lighting. Wiring low-voltage data cables to a central point helps. For radios that do not share a stack, use bridges: Zigbee‑to‑MQTT or Bluetooth‑to‑MQTT bridges make otherwise incompatible devices speak the same language.
Example setup:
- Cameras via RTSP into Home Assistant.
- Casambi via a Bluetooth gateway that exposes MQTT topics for brightness and scene control.
- Heat pump via Modbus TCP or a manufacturer API integration.
- Ventilation unit via Modbus or a relay input controlled from a GPIO expansion board or a dedicated interface.
Custom Automation Scenarios
Write automations in YAML or via the visual editor. A few I use:
-
Ventilation pause for open windows
- Trigger: window contact opens.
- Condition: ventilation in auto mode.
- Action: switch ventilation to low or pause.
- Verification: check the ventilation unit status entity changes and log a timestamp.
-
Doorbell to touchscreen
- Trigger: doorbell pressed.
- Action: show full‑screen camera view on the touchscreen, play a chime.
- Action 2: if time is night, turn on porch light at 30% for 2 minutes.
-
Heat pump seasonal setback
- Trigger: outside temp sensor and time of day.
- Action: set heat pump target temp via its integration.
Numbered steps to implement a simple automation in Home Assistant:
- Create entities for the device you will act on, check each entity appears in Developer Tools.
- Build the trigger and run a dry run by firing the trigger in Developer Tools.
- Add conditions. Test the automation with the Developer Tools simulate function.
- Enable logging for the automation and monitor the state changes in the logbook.
Verification: use the History and Logbook to confirm the automation fired and that device states changed as expected.
Troubleshooting Common Issues
Common problems are cloud‑only devices, radio range, and flaky integrations.
- Cloud‑only devices: replace them or use a local bridge.
- Bluetooth range for Casambi: Bluetooth mesh needs nodes in range. A gateway placed centrally fixes this.
- Camera lag: use wired ethernet where possible. If using Wi‑Fi, set the camera to 2.4 GHz or place a dedicated AP nearby.
- MQTT drops: run Mosquitto on the same Pi or on a local NAS to reduce network hops.
When something fails, check logs, then entity state, then network connectivity. That order gives the fastest diagnosis.
Enhancing Security with Smart Home Tech
Local control reduces exposure. My practical steps:
- Keep Home Assistant on a VLAN or separate network from guest Wi‑Fi.
- Use strong passwords and long random tokens for integrations that require them.
- Block cloud access for devices that can work locally.
- Run automatic backups of your Home Assistant config and snapshot them to an offsite location.
Future‑Proofing Your Smart Home
Design the central spot with spare ports and power. Leave wiring for future sensors and a spare USB port for another radio stick. Prefer standards such as MQTT, Modbus and RTSP where possible. Buy devices that provide a local API or documented protocol.
Final takeaway: pick local control first, wire the central point for the devices you care about, and build simple automations that you can test and verify. A Raspberry Pi with Home Assistant, a touchscreen and a few protocol bridges handles heat pump, ventilation unit and doorbell camera in one place.